
How to Use Filters in StoreMantis
Lets
first try to understand the concept of filters in StoreMantis. In a
conventional store front-end, youll probably find an Advanced search
feature so that users can filter products according to their
preferences. But sometimes, you want to group different kinds of
products together, although they belong to different categories. Or you
would like to attach a tag to certain products so that they can be found
easier in the front-end.
To
understand it more clearly, lets take a real-world example. Lets
assume that you have a Monitors sub-category available under the
Components main category. And you would like to categorize monitors
further by LED, LCD, and CRT.
The
first option that pops up in your mind is to create another level of
categories under Monitors. But instead of creating another level of
categories, which could make things a bit more complex, you can use
filters in StoreMantis.
The
benefit of using filters in the above scenario is that when you enable
the Filter module, it provides a nice blockin the front-endwhich
allows users to refine the relevant products of their choice.
Lets go ahead and set this up.
Create the New Filter Group and Filters
Head over to the admin section of StoreMantis and go to Catalog > Filters. Click on the Insertbutton to open the screen which allows us to create a new filter group and filters. Filter Group Nameis
the title used to distinguish the filters when more than one set of
filters is available for display. Just fill in the details as shown
below.
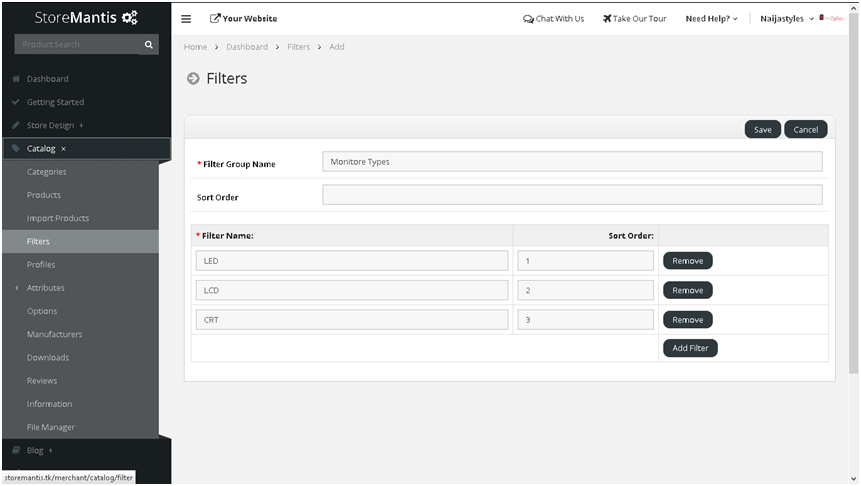
As you can see, weve created a filter group Monitor Types and the filter values are LED, LCD, and CRT. Click on the Save button to commit the changes.
Assign the Filters to Categories and Products
Now
weve set up the filter group and associated filters. Further, we need
to assign the filters to the relevant category and products.
Assign Filters to a Category
Lets
first assign filters to a related category. For this example, Im
assuming you have a category called Components which has a Monitors
subcategory.
Continuing with our earlier example, lets go ahead and edit the Monitorscategory. Go to Catalog > Categoriesand edit the Monitorssub-category under the Componentsmain category. Click on the Data tab, which shows different fields, amongst which is Filters.
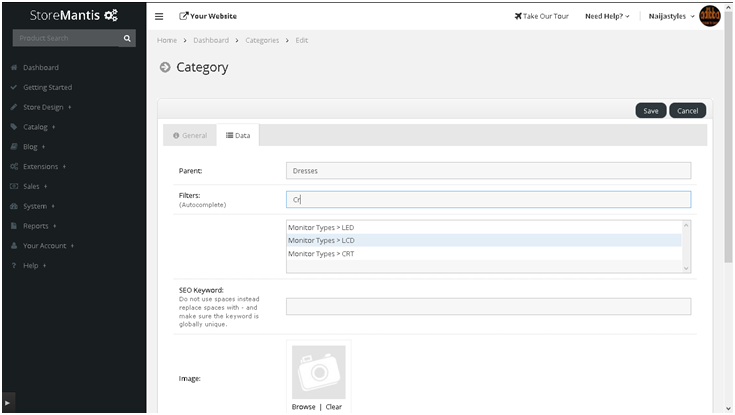
Filtersis
an autocomplete field. So you can select the values by just typing a
few letters. In our example, you would like to choose LED, LCD, and
CRT as filter values. Click on the Savebutton to apply the changes.
Itll
make sure that when the Filters block is displayed on the Monitors
category page in the front-end, itll display all three of the options
weve selected in the Filters field under theData
tab.
Assign Filters to Products
Now
we need to assign filters to the each product that we would like to be
filtered by our Monitor Types criteria. Obviously, we would like to
edit the products under the Monitors category as weve set up the
filters for that category in the previous section.
Go to Catalog > Productsand edit a product. Under the Linkstab youll see the Filterfield. Lets select LED and save the product.
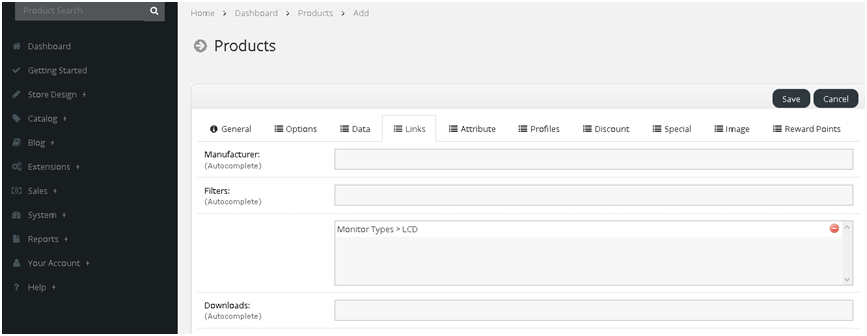
In
the same way, go ahead and assign LCD to another product . So now we
have two different products assigned with two different filter values.
Also, you can assign more than one filter to the same product if needed.
But in our case well keep it simple.
Enable the Filter Module
Were
almost done with the setup! The only remaining thing is to enable the
filter module and assign it to the appropriate layout in the font-end.
Go to Extensions > Modulesand install the Filtermodule.
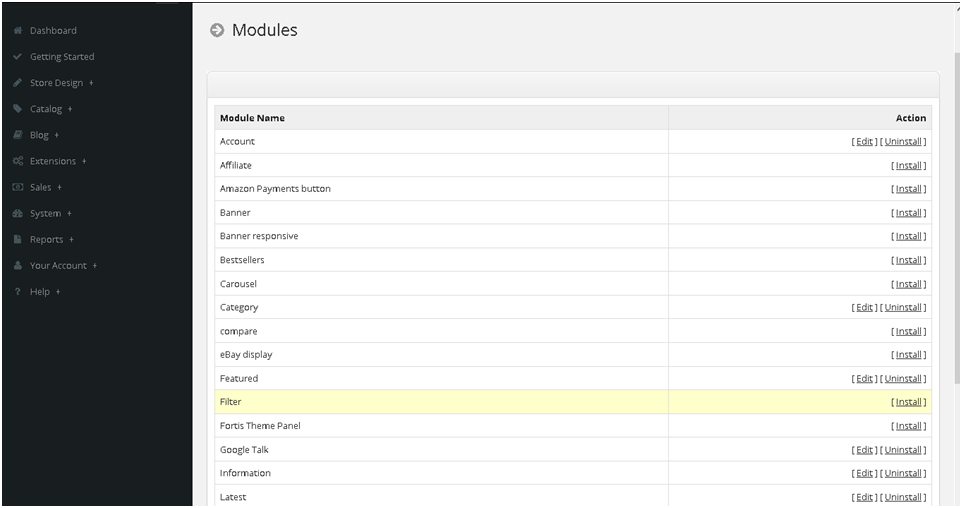
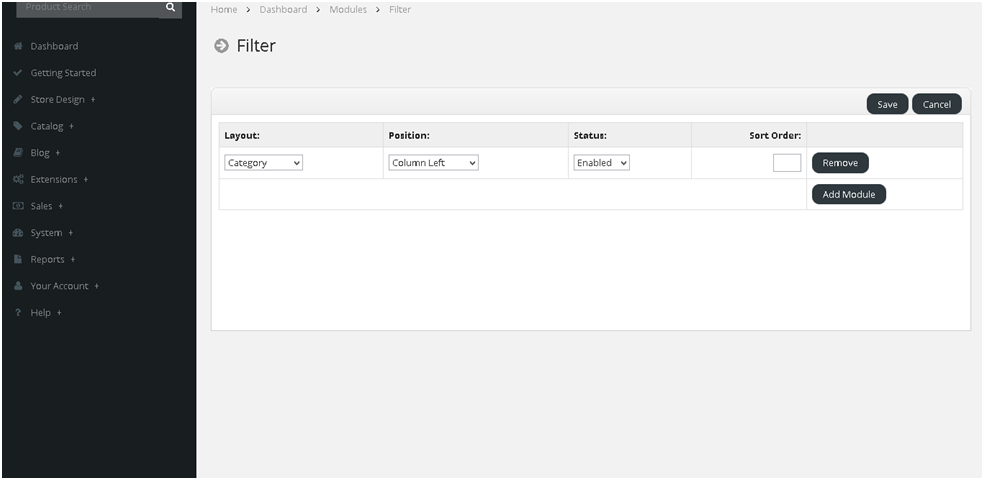
After installing the Filtermodule, click on the Editlink to open the module configuration page. Click on the Add Modulebutton to add a new row, and choose the options shown below.
In
our example, itll only make sense if we display our module in the
Category layout. Itll make sure that when a user is browsing the
products by category, the Filters block will be helpful in filtering
out the products further. So weve selected Categoryin the Layoutdrop-down, and well display it in the Column Leftposition. Click on Saveto apply the changes.
Testing the Front-End
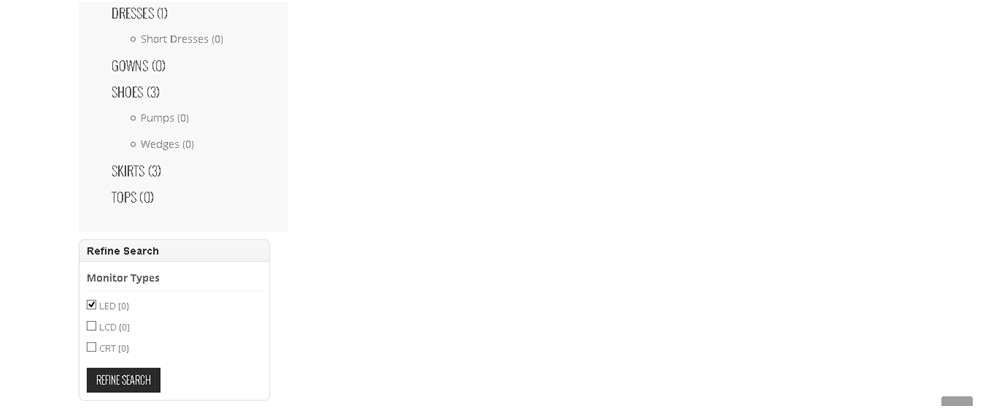
So finally its time to see things in action in the front-end. Head over to the front-end and selectComponents > Monitors (2)to list the products available under the Monitors category. You should see the Refine Searchblock on the left sidebar. Pretty cool, isnt it?
So
as you can see, its a really nice-looking block showing the different
filter options, with the total number of products available in each
filter. Just select LEDand click on Refine Searchto see the filtered product listing.
If you are familiar with Faceted Search, the interface looks similar
to that. In the same way, you can set up more filter groups and filters
to display a rich refining interface in your front-end store!